How to Choose Sublimation Ornament Designs for Photos and Names
Wondering how to choose sublimation ornament designs when a favorite photograph and a family name both need to fit? The usable center matters more than the blank’s overall silhouette. A circle, heart, star or snowflake can carry a keepsake, but each changes the crop and the space near its hanging hole. This guide helps you choose the shape, protect the important details and plan the front and back before preparing your transfer.
Quick Answer
- Choose the exact sublimation-ready blank and its template first; the shape name does not establish dimensions, coating or printable sides.
- Keep faces and names within the central safe area, away from the hanging hole, ribbon and narrow points.
- Crop a copy of the photograph to the ornament outline without stretching it, then inspect the smallest important face at actual size.
- For two-sided artwork, confirm that both faces are printable and plan their upright orientation around the same hanging hole.
- Verify names, dates and editable elements, then print an actual-size paper proof before following the blank supplier’s transfer instructions.
In this guide:
- Choose a Shape That Leaves Room for the Keepsake
- Check the Exact Blank and Its Printable Faces
- Crop the Photograph Without Losing the People
- Give the Name Its Own Readable Space
- Plan the Hanging Hole and the Back as Part of the Design
- Inspect an Actual-Size Proof Before Preparing the Transfer
- Checklist Before Choosing an Ornament Design
- Frequently Asked Questions
Choose a Shape That Leaves Room for the Keepsake
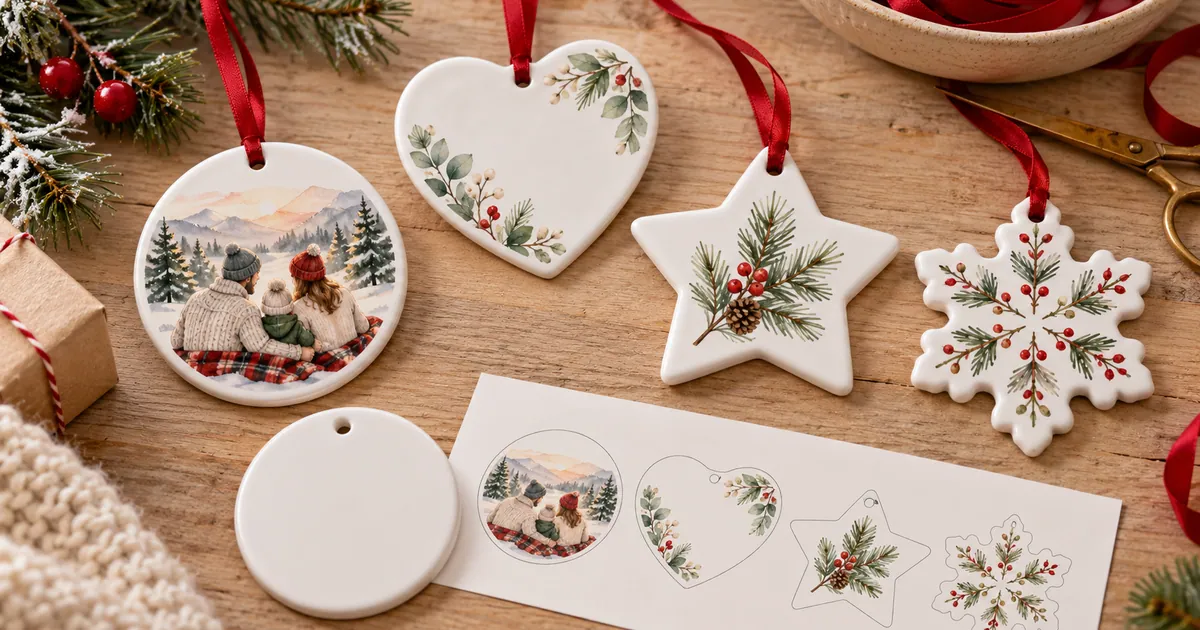
Decide which detail gives the ornament its meaning: a family portrait, one child’s face, a pet, or a name with a short message. Then compare how much uninterrupted central space each outline leaves. The total height or width includes edges that may be unsuitable for lettering or facial details.
| Shape | Composition to consider | Detail to protect |
|---|---|---|
| Circle | A centered portrait or compact name arrangement | The hanging hole and the crop around outer faces |
| Heart | One or two faces in the broad upper-middle area | The top notch, hole and narrowing bottom tip |
| Star | A simple central photograph, initial or small illustration | Faces and words near the narrow points |
| Snowflake | A compact motif or portrait inside the central body | The arms, gaps and top hanging area |
A group photograph may need a roomier center than one face. If the heart or star forces you to cut someone out or shrink every face too far, choose a different photograph or outline. The holiday photo and family keepsakes help compare photo-led arrangements with complete decorative graphics; inspect the actual file rather than assuming every design accepts a picture.
Check the Exact Blank and Its Printable Faces
Confirm the material and intended printing process before adapting the artwork. A ceramic or metal ornament should be supplied for sublimation with the relevant prepared surface. An ordinary decoration with a similar shape is not automatically compatible. The supplier’s product information should also tell you which sides can be printed.
Two-sided ceramic blanks exist, but that does not mean every ornament has the same coating or press procedure. Some decorative ornaments use a separate printable insert, so the outer frame can be larger than the image area. Match the template to the actual model and any insert, not simply to the widest measurement of the decoration.
Read the template’s own key for physical edges, safety lines, bleed and areas that should remain free of important details. Those zones serve different purposes: a background may extend beyond an edge while a name stays comfortably inside it. Hide the template guides before creating the transfer, and use the supplier’s instructions for pressing and handling that particular material.
Crop the Photograph Without Losing the People
Place a copy of the photograph behind the ornament outline and preserve its proportions. Move the crop to keep the intended faces together, then inspect where shoulders, ears or a pet’s head meet the edge. A landscape family picture may not suit a narrow shape without losing someone, even when the source photograph has plenty of pixels.
Allow space for any decorative frame and name rather than filling the whole center with faces. If the download includes a photo opening, confirm how you insert the picture and whether the surrounding art is separate. A mockup showing a photograph does not establish that the supplied file contains an editable frame or an empty opening.
Check detail after the crop. At a target of 300 pixels per inch, a 3-inch-square raster layout needs 900 × 900 pixels before any additional bleed required by the template. That is an arithmetic example, not a universal ornament size. The file formats guide explains how pixel dimensions and resampling affect a print; enlarging a small photograph does not restore its original missing detail.
Give the Name Its Own Readable Space
Write the exact name, date and message before selecting an arrangement. A short first name may fit under a photograph, while a long family surname can require more width or a separate back layout. Keep names clear of faces and busy illustrated borders so the personal detail remains easy to recognize.
Check how the file supports the intended change. Existing lettering in a flattened PNG may remain part of the picture; an included vector file also needs inspection for editable text or outlined letters. A design with open space can let you add your own name without replacing its original words, provided you have a suitable way to build the layout.
For a milestone, inspect every displayed year rather than assuming the preview is evergreen. The baby’s first Christmas designs include both lettering and illustrated options. Choose the file whose wording and date suit the actual keepsake, and proofread the final arrangement against your notes rather than against a sample mockup.
Plan the Hanging Hole and the Back as Part of the Design
Treat the hole and ribbon as visible parts of the finished ornament. A face positioned directly below the hole can be crowded by a bow or hanging string. Keep the key content lower in the usable center and preview the actual hanging arrangement before committing to a decorative border.
For a confirmed two-sided blank, decide what each face should do. You might repeat the artwork, put a photograph on one side and a name on the other, or pair a picture with a short date or message. Separating those elements can reduce crowding on the front, but both layouts still need their own readability check.
Plan the orientation around the physical top and hole so both sides appear upright when the ornament hangs. Do not confuse this front-and-back placement with mirroring the transfer file; follow the printing workflow for mirroring at the correct stage. The pressing order, protection of the completed face and cooling procedure should come from the blank supplier, because they vary with the ornament material and equipment.
Inspect an Actual-Size Proof Before Preparing the Transfer
Small keepsakes reward a careful final-size check. A border that looks generous on screen can consume most of a star’s center, while a long name can become hard to read after the photograph is added. Use a paper outline to judge those relationships on the actual blank, including where the ribbon will sit.
- Identify the exact ornament model, dimensions, printable faces and supplier template.
- Choose the photograph or motif and place it within that outline with its proportions preserved.
- Keep names, faces and dates inside the safe area, clear of the hanging hole and narrow edge details.
- If using both sides, prepare separate front and back layouts with a consistent physical top.
- Print the layouts at actual size with automatic scaling disabled; measure them and compare them with the blank.
- Check every name and date, inspect the hanging arrangement and hide template guides before preparing the transfer.
- Follow the supplier’s material-specific printing, pressing, handling and cooling guidance.
A paper proof establishes fit and readability rather than final sublimated color. If you prefer a complete illustration instead of a photo layout, compare the Christmas ornament designs for a focal motif that remains useful inside your chosen shape.
Checklist Before Choosing an Ornament Design
- The exact blank is suitable for sublimation and its printable sides are confirmed.
- The template matches the actual model or printable insert.
- The shape leaves enough central room for the selected photograph or message.
- The crop preserves every important face and keeps the image’s proportions.
- Names, dates and any milestone wording are correct and genuinely editable as needed.
- The hole, ribbon, notch and narrow points stay clear of key details.
- Front and back artwork have been checked for their hanging orientation.
- Source pixels support the final cropped print size.
- Actual-size paper proofs fit, and template guides are excluded from the transfer.
Find Designs for Your Project
Choose a photo-ready arrangement or complete illustration that suits the blank you have confirmed.
- Photo and family ornament artwork — compare photo compositions, named family layouts and decorative alternatives
- Christmas ornament designs — look for complete motifs that suit your ornament’s central area
- Baby’s first Christmas keepsake designs — check milestone lettering, dates and the included file formats
Frequently Asked Questions
Can the same photograph fit a circle and a star ornament?
Sometimes, but each shape needs a separate crop. A star’s narrow points can remove details that remain inside a circle. Keep faces in the central area and inspect both arrangements at actual size.
Are all sublimation ornaments printable on both sides?
No. Confirm the printable faces in the exact blank’s description. Two-sided prepared ceramic and metal blanks exist, while other decorations can have only one printable area or a separate insert.
Does a photo in the preview mean the file has an editable photo frame?
No. Read the download description and inspect the file’s contents. A photo opening, separate decorative layer or editable source must be confirmed before you plan to replace the sample picture.
Where should a name sit on a photo ornament?
Give it clear space inside the template’s safe area, away from faces, the hanging hole and narrow tips. A longer name may work better on a separate back layout when both faces are printable.
Protect the Detail That Makes the Ornament Personal
Choose the shape around the photograph and message, then check the hole, crop and hanging orientation together. A clear face and correctly spelled name in a comfortable central layout can carry the keepsake without crowding every edge.