The 20 oz Tumbler Wrap Template Guide: Straight vs Tapered
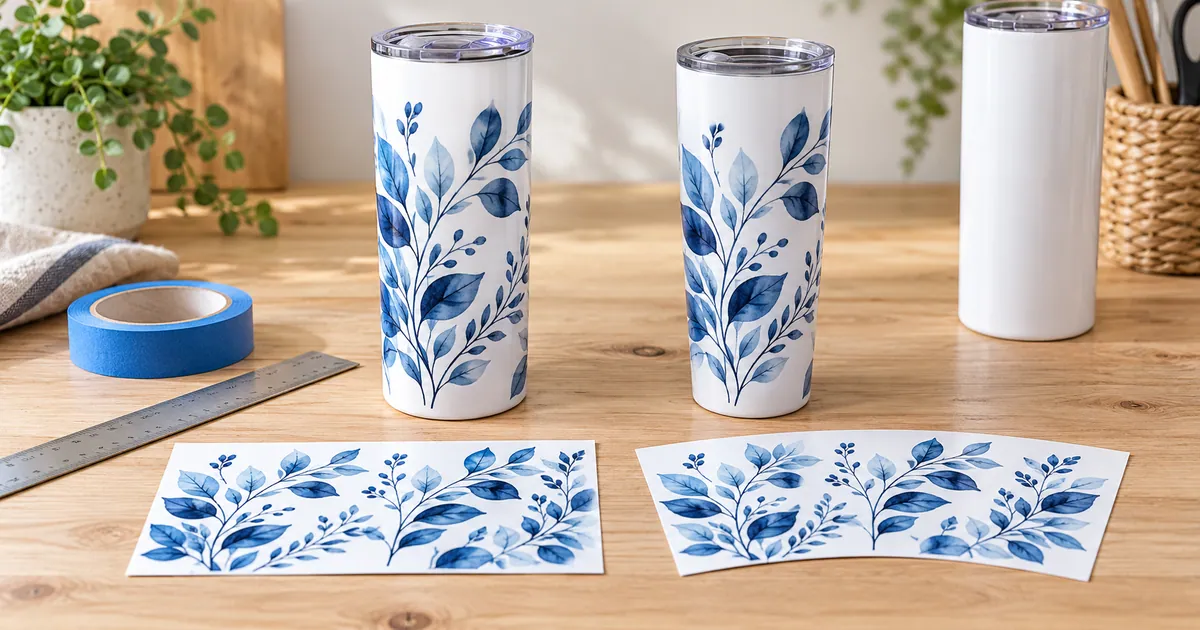
Choosing a 20 oz tumbler wrap template begins with the shape of your coated blank, not its capacity alone. Two skinny tumblers can hold the same amount and still need different paper outlines. This guide helps you identify a straight or tapered surface, compare the download with your measurements, position the seam and check a full-size paper wrap before preparing your transfer.
Quick Answer
- Match the template to the exact tumbler model and the coated area you can actually print.
- A straight cylindrical band usually takes a rectangle; a tapered band needs a shape that accounts for different top and bottom circumferences.
- Measure around the upper and lower print boundaries and record the usable height. Capacity is not a measurement of the printable surface.
- Check whether the supplier’s template already includes overlap or bleed before adding more.
- Keep faces and lettering away from the seam, and prove the fit on paper printed at actual size.
In this guide:
- Identify the Shape of the Printable Band
- Measure the Top, Bottom and Usable Height
- Treat Common Wrap Dimensions as Examples
- Check What the Straight and Tapered Files Actually Include
- Decide Where the Seam and the Main Feature Will Meet
- Use a Paper Wrap to Catch Fit Problems Before Printing
- Checklist Before You Print the Wrap
- Frequently Asked Questions
Identify the Shape of the Printable Band
Look at the area between the top and bottom print boundaries rather than only the cup’s silhouette. A straight skinny tumbler has parallel sides across that band. A tapered one becomes narrower toward the base. Some cups also have a rounded shoulder or curved base that sits outside the useful printing area. Those transitions should not be treated as part of one straight cylinder.
| Printable surface | Paper shape to check | Typical mismatch |
|---|---|---|
| Straight cylindrical band | Rectangular wrap for the correct width and height | Too much or too little coverage at the seam |
| Tapered band | Supplier’s curved, fan-shaped or otherwise fitted outline | A rectangle leaves excess paper near the narrower end |
| Body with curved transitions | Template that marks the usable coated band | Art extends into an area the equipment cannot cover evenly |
Names such as straight, tapered and warped describe a file’s intended fit, but use the actual template and measurements to confirm it. The Christmas skinny tumbler wraps include examples with both straight and tapered versions. Select the appropriate version before considering the illustration.
Measure the Top, Bottom and Usable Height
Confirm that the blank is intended for sublimation and find its supplier’s template. Record the item model beside your measurements so that a similar-looking cup from another batch does not inherit the wrong file. Do not infer sublimation compatibility from a white exterior, stainless steel construction or the term skinny in a listing.
- Mark the upper and lower boundaries of the usable print band using the supplier’s guidance. Exclude the lid, rim and rounded base.
- Use a flexible tape or a narrow paper strip to measure the circumference at the upper boundary. Keep it level around the cup.
- Repeat at the lower boundary. If those measurements differ, inspect the supplier’s tapered template rather than assuming a rectangle will fit.
- Record the usable height as directed by the template, keeping separate any specified clearance or bleed.
- Compare all three measurements with the supplied outline and print a paper proof before changing the artwork.
Tip: A ruler across the mouth measures diameter, not wrap width. Use the circumference of the printing band when checking how far the paper must reach around the cup.
Treat Common Wrap Dimensions as Examples
A frequently listed straight 20 oz layout is 9.3 × 8.2 inches, with the wider dimension running around the cup. At a target of 300 pixels per inch, that corresponds to 2790 × 2460 pixels. The personalized tumbler themes contain files described at that size, but it is not a universal specification.
For comparison, a published supplier template for a 20 oz shimmer model specifies a 9.5-inch wrap direction and an 8.14-inch height, with a small overlap already built into the outline. The difference is enough to justify checking the actual model rather than printing every download at the same dimensions. Use the supplier’s own layout for that particular blank.
Keep width and height in clearly labeled physical units. Changing an image’s DPI setting does not create extra detail, and resizing the width separately from the height can distort lettering. If the file has insufficient source pixels or incompatible proportions, choose another included size or a better-fitting design instead of forcing it into the template.
Check What the Straight and Tapered Files Actually Include
A rectangular print can wrap smoothly around a cylinder because its circumference stays consistent across the printable height. A cone changes circumference, so its flattened surface requires a different outline. A tapered download may therefore show curved edges and artwork arranged to suit that shape. Check the supplier’s profile; not every tapered tumbler shares the same degree of taper.
If the PNG is already shaped for a tapered blank, do not apply a second generic warp without a reason. You could distort a face or bend a greeting that was already arranged correctly. Conversely, a design described as seamless may refer to its pattern repeat rather than a ready-to-fit outline for your cup. Read the listed formats and versions separately from the style description.
The Valentine 20 oz tumbler selection offers both single straight files and downloads with tapered options. Compare the actual outline with your blank before cropping. A seasonal theme cannot compensate for missing geometry.
Decide Where the Seam and the Main Feature Will Meet
Choose the intended front of the tumbler, then place the join where it causes the least interruption. A face or complete name usually belongs well away from the two vertical ends of the wrap. A repeated leaf pattern may be more forgiving than one continuous sentence, but even a pattern needs its repeat checked at the join.
Print the layout and bring its edges together around the cup. Look for a doubled leaf, an interrupted stripe or an abrupt change in background color. A design advertised as seamless may still show a join if your measured width differs from the designer’s intended repeat. Plan the crop with both ends visible together, rather than judging the center of the flat preview alone.
Separate artwork overlap from the physical paper overlap required by the supplier. If the template already includes an allowance, adding more changes where the repeat meets. Keep the important text inside its safe region and follow the supplier’s instructions for securing the transfer. A layout check cannot establish whether the heat and contact will be sufficient during pressing.
Use a Paper Wrap to Catch Fit Problems Before Printing
An ordinary paper proof is useful for shape, size and placement. It does not predict final color or replace material-specific press instructions. Keep the first proof unmirrored so that you can read the greeting and judge its position directly. Make the final transfer separately with the mirroring required by your printing workflow.
- Print the verified outline and artwork at 100 percent, with fit-to-page disabled. Check a known dimension with a ruler.
- Trim the paper to the intended wrap shape. Fit it around the blank without pulling it into a different shape.
- Check the upper and lower edges together. Excess paper at one end or a widening gap can indicate the wrong profile or dimensions.
- Inspect the focal artwork from the intended front, then rotate the cup and read the complete wording. Check the join without hiding one end under your hand.
- Adjust the layout or select the correct straight or tapered version, and repeat the paper check if the size changes.
- Remove template guides from the output and prepare the sublimation transfer. Follow the supplier’s directions for tape, time, temperature, pressure, equipment coverage and cooling.
If you are also making matching ceramic drinkware, use the mug design fit guide for its separate dimensions and handle area. A successful tumbler outline should not be reused as a mug template.
Checklist Before You Print the Wrap
- The blank is explicitly suitable for sublimation.
- Its exact model and usable print band are recorded.
- Top and bottom circumferences agree with the chosen template shape.
- The supplied overlap or bleed has not been added twice.
- Physical units and the document orientation are correct.
- Source pixels support the final print dimensions.
- Faces, names and other focal details avoid the join.
- The paper proof fits without forcing the upper or lower edge.
- The final transfer follows the blank supplier’s printing and pressing instructions.
Find Designs for Your Project
After confirming the shape, compare the versions included with the artwork.
- Christmas 20 oz skinny tumbler wraps — compare straight files with downloads that include tapered versions
- Valentine tumbler wraps — check individual size and shape notes for romantic drinkware
- Tumbler themes for personalized gifts — choose the recipient’s interests after the template fits
- Everyday sublimation tumbler designs — compare photo layouts, bundles and colorful wraps
Frequently Asked Questions
Is every 20 oz skinny tumbler wrap 9.3 × 8.2 inches?
No. That is a common design-file size, not a specification for every blank. Confirm your actual print band, template profile and any built-in overlap before choosing the output dimensions.
Can I use a straight template on a tapered tumbler?
Do not assume it will fit. Different circumferences can leave excess paper or a gap at one end. Use the supplier’s fitted outline and check it around the physical blank.
Does seamless mean the wrap fits my tumbler automatically?
No. Seamless can describe the artwork’s repeat. The correct template shape, printed width and placement still determine how the two ends meet around your particular cup.
How much extra overlap should I add?
Follow the template or blank instructions. Some templates already include overlap, so adding a second allowance changes the size and pattern alignment. Avoid choosing one fixed amount for every tumbler.
Fit the Shape Before Choosing the Theme
Save the blank model, measured band and approved paper outline with your artwork. Once the top, bottom and seam agree, choosing a floral, holiday or personalized design becomes a clearer decision instead of another sizing guess.