Sublimation Keychain Template Guide: Sizes, Shapes and Layouts
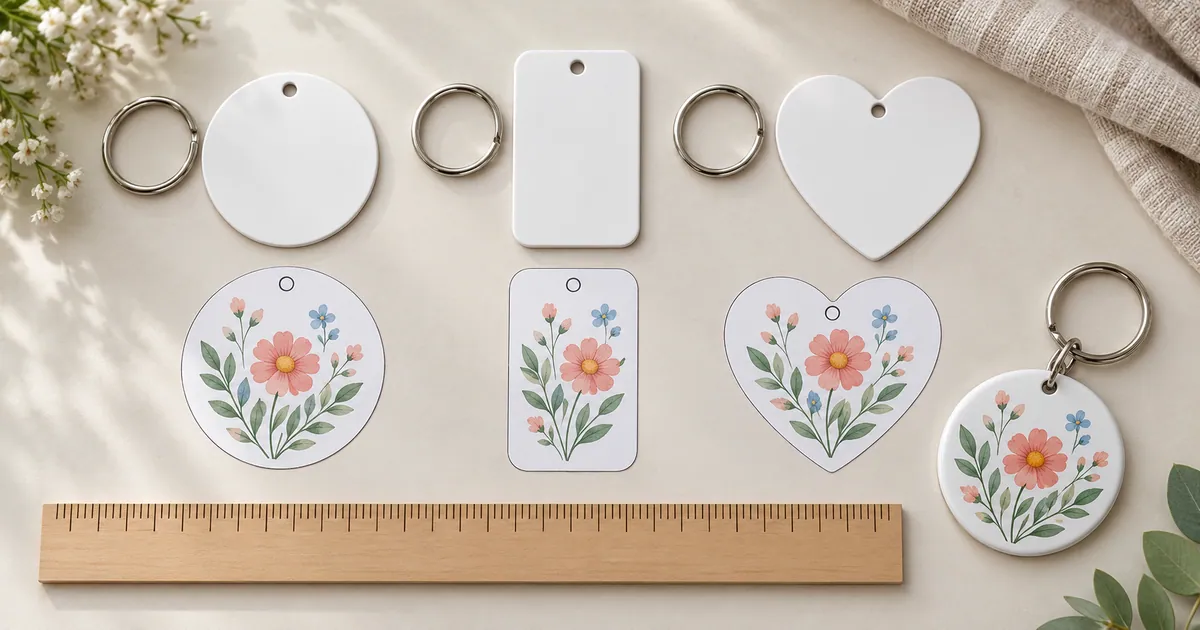
A sublimation keychain template helps you place a design around the blank’s outline and hardware hole before printing. The important match is the exact blank, not just the word round or heart in a filename. This guide shows how to compare shapes, separate background bleed from safe space, keep small lettering readable and plan both sides without turning the back upside down.
Quick Answer
- Use the template supplied for the exact blank; shape names alone do not establish size or hole position.
- Keep background bleed outside the edge and names, faces and important details inside the safe area.
- Use inches or millimeters for the layout and verify the printed paper outline with a ruler.
- Choose short, high-contrast lettering and inspect it at the keychain’s actual finished size.
- For a double-sided blank, map the front and back around the hardware hole before preparing the transfers.
In this guide:
- Tell a Blank Template From a Finished Design
- Measure the Shape and Record the Hole Position
- Reserve Space for the Hardware and the Outer Edge
- Check Pixel Size and Read the Small Lettering
- Plan the Front and Back Before Mirroring
- Make a True-Size Proof Before Preparing the Transfer
- Checklist Before You Print
- Frequently Asked Questions
Tell a Blank Template From a Finished Design
A blank template describes geometry: the outer shape, any hole, and sometimes separate safety and bleed boundaries. A finished design is the artwork you place within those boundaries. A circular PNG may be ready to print, but it does not necessarily provide an accurately positioned hole or a guide for your supplier’s blank. Treat those as two different jobs when inspecting a download.
Some files labeled templates are editable photo frames or layouts for adding a name. Others are cutting files intended for vinyl on acrylic rounds. Neither label proves that the physical blank supports dye sublimation. Verify the material and printing method first, then check whether your software opens the included format correctly.
The personalized keychain design selection shows why this distinction matters: shaped frames and finished circular artwork can appear in the same collection. Choose the file that solves your layout problem instead of assuming every download supplies the blank outline.
Measure the Shape and Record the Hole Position
Measure the printable face in the orientation in which the keychain will hang. Record the outside width and height, then the distance from the upper edge to the center of the hardware hole. If the supplied template disagrees with your physical blank, check the item model and document units before resizing anything. A screen view is not a reliable ruler.
| Shape | Measurement to confirm | Layout risk |
|---|---|---|
| Round | Exact diameter; round artwork commonly appears at 2 or about 2.53 inches | A name near the top can collide with the hole |
| Rectangle | Actual width, height, corner curves and hole location | A square graphic can become distorted if stretched |
| Heart | Full outline, notch depth and widest point | The upper notch and pointed base can crop faces or letters |
The round sizes above are examples seen in design downloads, not a recommendation to print every round blank at either diameter. Rectangular and heart shapes need the supplier’s own outline; there is no useful single size for all of them. For unfamiliar curves, a true-size paper outline reveals the fit more clearly than a width-and-height box.
Reserve Space for the Hardware and the Outer Edge
Think in three zones. The physical edge describes the finished face. Background bleed extends beyond it to support full coverage where the supplier requires it. The safe area holds the details you cannot afford to crop. Follow the template’s indicated allowance rather than adding one fixed margin to every material and shape.
For a name-led design, place the word below the hole and check it with the actual ring or connector nearby. The hardware may visually compete with a tall letter even when it does not physically cover the print. A round floral border can extend into the bleed; the person’s name should stay comfortably inside the finished outline.
On a heart, keep a face away from the upper notch and the lower point. On a rectangle, use the full length for a short stacked name or one vertical motif. If moving a focal element is impossible in a flattened image, select a composition that already gives it more space.
Check Pixel Size and Read the Small Lettering
Decide the physical print dimensions before judging a raster file. For a target of 300 pixels per inch, a 2-inch-square image needs 600 pixels along each side. A 2.53-inch-square layout needs about 759 pixels per side. These are calculations for that print density, not guarantees about color, the blank or the quality of the original drawing.
PNG can preserve a transparent background, while JPG does not support that transparency. An editable vector file may let you adjust separate shapes, but a PNG containing a name normally keeps that name as pixels. Check the actual contents instead of inferring editability from the preview. The colorful keychain PNG bundles include examples with different dimensions and formats.
Use a short name, initials or a compact phrase if space is limited. Prefer clear strokes against a contrasting background; an ornate script with tiny gaps can become difficult to read. Judge the paper proof at ordinary viewing distance. A monitor zoomed to 200 percent can conceal the very issue you need to catch.
Plan the Front and Back Before Mirroring
First confirm whether your particular blank has one printable side or two. For a double-sided gift, create two separate layouts using the same verified outline. You might place a floral illustration on the front and initials on the back, or use a coordinated pattern on both. Keeping two named files makes their orientation easier to review.
Make a plain paper dummy with the hardware hole marked. Label its front and back on the proof only, flip it as the finished charm will turn, and check which direction the letters face. This is especially useful for a rectangular blank that can be flipped sideways or end-over-end. Do not assume that reversing the entire front image produces a readable back.
Mirroring for the transfer is a separate print step. Decide the finished orientation first, then mirror once at the point required by your printing workflow. For pressing the second side, follow the blank supplier’s procedure for protecting the first side and controlling cooling. A design download does not establish those material-specific instructions.
Make a True-Size Proof Before Preparing the Transfer
A paper proof checks layout without using your coated blank. It should let you compare the physical edge, hardware location and readable detail together. Save the approved document so that rearranging several designs on a sheet does not accidentally change their dimensions. Recheck the page scaling after any export to PDF or another printing application.
- Open the correct blank template and verify its units. Keep the outline locked while arranging the artwork.
- Place the focal graphic inside the printable face. Extend only the background into the bleed specified for your blank.
- Print a proof at 100 percent or actual size, with fit-to-page disabled. Measure it before trimming the outline.
- Put the paper against the blank and compare its hole with the real hardware hole. For two sides, use a folded or paired paper dummy to check orientation.
- Inspect names, small strokes and important facial features. If they are too small, simplify or replace the composition instead of stretching it.
- Hide the template guides, labels and hole outline before preparing the final print, then apply the supplier’s transfer and pressing instructions.
Tip: Use a round crop only when your blank is round. A heart motif printed on a circular file is artwork about hearts, not necessarily a template for a heart-shaped blank.
Checklist Before You Print
- The material is explicitly suitable for sublimation.
- The template matches the exact blank model and printable side count.
- Document units and physical dimensions are correct.
- The hardware hole agrees with the real blank.
- Names and faces stay within the safe area.
- Background coverage follows the template’s bleed guidance.
- Small lettering is legible on the measured paper proof.
- The reverse side hangs the right way up.
- Guide lines and temporary labels are hidden before output.
Find Designs for Your Project
Once the outline fits, compare artwork that leaves enough room for your chosen layout.
- Personalized small-gift keychain designs — compare circular art and editable frame options
- Colorful keychain PNG bundles — check dimensions and formats before adapting the crop
- Everyday keychain design bundles — choose florals and backgrounds for coordinated gifts
Frequently Asked Questions
Is there a standard sublimation keychain template size?
No single size covers every blank. Round artwork often uses 2-inch or approximately 2.53-inch layouts, but you must compare those dimensions with the actual blank and its supplier’s template.
Can I turn a round design into a heart template?
You can crop suitable artwork inside a verified heart outline, but that may remove important details. Preview the notch and pointed base first; do not stretch the circle into a heart.
How much space should I leave around the hardware hole?
Use the template’s safe area and check the actual connector against your layout. Hole positions and hardware sizes vary, so a fixed margin for every keychain is unreliable.
Do I need a separate design for each side?
For a two-sided blank, separate front and back layouts help you control orientation and readability. The artwork can match, but verify its direction with a paper dummy before mirroring the transfer.
Keep the Template With Your Chosen Design
Save the fitted artwork, blank model and approved physical dimensions together. Next time you want a matching charm, you can change the motif while retaining a layout whose outline, hole and viewing direction have already been checked.